
Not interested in the various technical tidbits? Skip to the end-user demo at the end of the article!
Table of Contents
Resources
The following resources can be used in this article by end-users:
- Panda3D Encryption Demo - available on GitHub - Download
- P3Dephaser, a GUI application used to extract multifile passwords - available on GitHub - Download
The following resources can be used to follow this article (for enthusiasts and brave folk):
Preface: Let’s talk about multifiles
Most people who have played Toontown Online between 2001 and 2013 are very familiar with the concept of multifiles. After all, multifiles allowed players to peek into the art assets of Toontown, all for a noble goal: creating content packs that had the power to modify the visual look, as well as the music of the game.
Many texture artists have begun their careers making new texture art for Toontown and its various derivatives. These artists are responsible for creating entire new experiences, transforming the atmosphere and overall feel of the game. Content packs such as Toontown Nightlife or Toontown at Dusk are staples of the community and are known by almost all players.
What’s common between those content packs? They’re all packaged and distributed as multifiles. That already gives us an idea as to what multifiles are. Multifiles contain multiple files: but what exactly do they contain? What are these files? Let’s take a look.
The brief history of multifiles
Since when exactly are multifiles a thing? Thankfully, the engine that was used to create Toontown is completely open source, and licensed under a fairly permissive license. This engine is called Panda3D, and its source code is currently available on GitHub. We may glance at the commit history - i.e. the history of the code’s evolution, from the beginning to today - to determine how exactly multifiles were born.
The earliest version of the multifile code that we have today dates back to Oct 4, 2000. On Oct 4, 2000 the Panda3D source tree was created, and all of the code that was previously written for the engine was merged into this tree. This is the earliest multifile code that we can find today through public means. This source code is plenty enough for our purposes, however: from it, we can learn that the multifile system began development on Jan 9, 1997, a whopping 24 years ago!1
This multifile system was significantly different from the one we have today: it did not have a versioning system (instead, it solely relied on a well-known, and decided in advance magic number), had a completely different header, and saved memfiles rather than modern subfiles, in a format that only looks similar to the modern multifile system we are familiar with today.
Why were multifiles invented in the first place? Not many know, but Panda3D used to have a proper acronym back in the day: PANDA used to stand for Platform-Agnostic, Networked, Display Architecture.2 Nowadays, this acronym is rarely used, and the current maintainers of the project often stress the obsolete status of the aforementioned acronym. However, let us discuss the relevance of the second attribute: Networked. This attribute is linked to three different functionalities of Panda3D: it refers to the fact that Panda3D can be used in multi-server rendering workflows, the fact that Panda3D can be used to synchronize client state using the Distributed Object system, as well as to the fact that the engine supports downloading game assets from a central download server.3
Let’s discuss that last aspect for now. MMORPGs are relatively large games, most often, but not always, larger in scope than other game genres such as FPS games. To provide an example, World of Warcraft, a popular MMORPG takes up 100 GB of available hard disk space as of Feb 27, 2021.4 This was especially true in the early 21st century. CDs had merely 700 MBs of available space, and most games that were available to purchase in retail had to make do with that much space. As such, games were often cut back graphically, or shipped with low quality audio to create disk space budget for more important content.
But MMORPGs were different. MMORPGs like Toontown Online could not be shipped easily on CDs. An MMORPG cannot exist for long without being updated. If an MMORPG is shipped on a CD, it will quickly become obsolete after being updated. But how do you update an MMORPG in an age when slow 56k modems reign supreme? Disney’s engineers took on this fascinating problem.
They decided to split the entire game world into multiple smaller phases. Each phase allows you to access a more broad subset of the entire game world. For example, downloading the first two phases allows you to start the game binary, downloading the third phase grants you the ability to play through the tutorial of the game, downloading the fourth phase lets you access the first actual game area, and so on. Downloading all phases grants access to the entire game world.
How is this useful?
-
For starters, splitting the game world into smaller files means that your players will only need to download the first few phases in order to start playing immediately. This is a great advantage when you’re administrating an MMORPG, as your players may get bored and may never play at all if they have to excruciatingly wait for hours on end just to begin playing.
-
Secondly, having the game loaded so quickly allows you to transparently download the rest of the game while the player is already engaged with the game.
-
Thirdly, if you make changes to a portion of the game world, you only have to push updates for the relevant portion of the whole game world. The benefits of this are especially amplified by Panda3D’s patch system, which allows each multifile to be patched without redownloading the entire multifile, just the individual changes themselves.
-
And last but not least, having smaller game archives dramatically cuts down on the update time necessary for the player to begin playing after a short absence from the game.
You may have guessed that we aren’t talking about this system for no reason. Multifiles were created in order to facilitate this system. All phases are contained within their own multifile, which contains all of the resources necessary to render a specific subset of the game world.
According to the Panda3D wiki:5
A multifile is a file that contains a set of files, similar to a .zip or .rar archive file. They are meant for containing multiple resources such as models, textures, sounds, shaders, and so on, and Panda can load them directly from the multifiles without having to unpack them first. Many games employ a similar concept of “data” file such as .upk for Unreal Engine and .pak for Quake Engine.
Multifiles are a special file format specific to the Panda3D game engine. They contain game assets, akin to how a ZIP file contains regular files. Multifiles can be easily extracted (and created) using one of Panda3D’s built-in tools: multify.exe. More details about the multify.exe utility may be found at the Panda3D wiki.
Since the multifile format’s creation in 1997, it has gone through many changes:
- On Aug 02, 2002, it was completely rewritten by David Rose. This new multifile format is close to the format we know today. It introduces subfiles, subfile flags, version information, and finally allows the deletion of subfiles from a multifile.
- Since Aug 04, 2002, subfiles from multifiles can finally be mounted to Panda3D’s virtual file system, allowing game assets to be streamed from a multifile without unpacking first to the hard drive.
- On Aug 06, 2002, compression support was added, reducing the file size of multifiles even further.
- On Sep 02, 2002, encrypted subfile support was added to multifiles. This allows game assets to be encrypted using a password, on an individual basis. We’ll be looking at this feature in particular shortly.
- Since June 09, 2006, timestamps are added to each multifile, and all of its subfiles. This allows the compilation date of a multifile to be determined.
- Since Sep 06, 2009, multifiles may be cryptographically signed. This prevents tampering by third-party entities, such as hackers trying to exploit a game, by allowing the game developer to sign all of their game assets, and selectively prevent the game from loading any assets that are not created by the game developers. Before this change, hackers were known to replace in-game models in order to give themselves an unfair gameplay edge. For example, replacing entire race tracks with models that had the finish line at the very beginning of the track allowed hackers to instantly win any race. With signing, developers may require all model files to be signed to prevent any modifications, but may allow unsigned texture or audio changes.
In this post, we’ll be discussing the technical aspect of the multifile format. We’ll also attempt to reverse engineer encrypted multifiles, in an attempt to demonstrate how, at best, it only serves as security through obscurity.
A deep dive into the multifile format
While there is no public information on the multifile format on the Panda3D wiki, we may look to other sources to understand this file format. In particular, David Rose, the engineer responsible for reworking the multifile system in 2002, provides a lengthy explanation of the format directly in the Panda3D source code. This documentation is, unfortunately, not exported to the Panda3D manual, but it does reward those who directly read the source code.
A multifile is a binary file. It is specifically made for the computer to understand easily, and is not meant to be read by humans. As such, opening a multifile in a text editor, such as Notepad++, will not result in anything human readable.
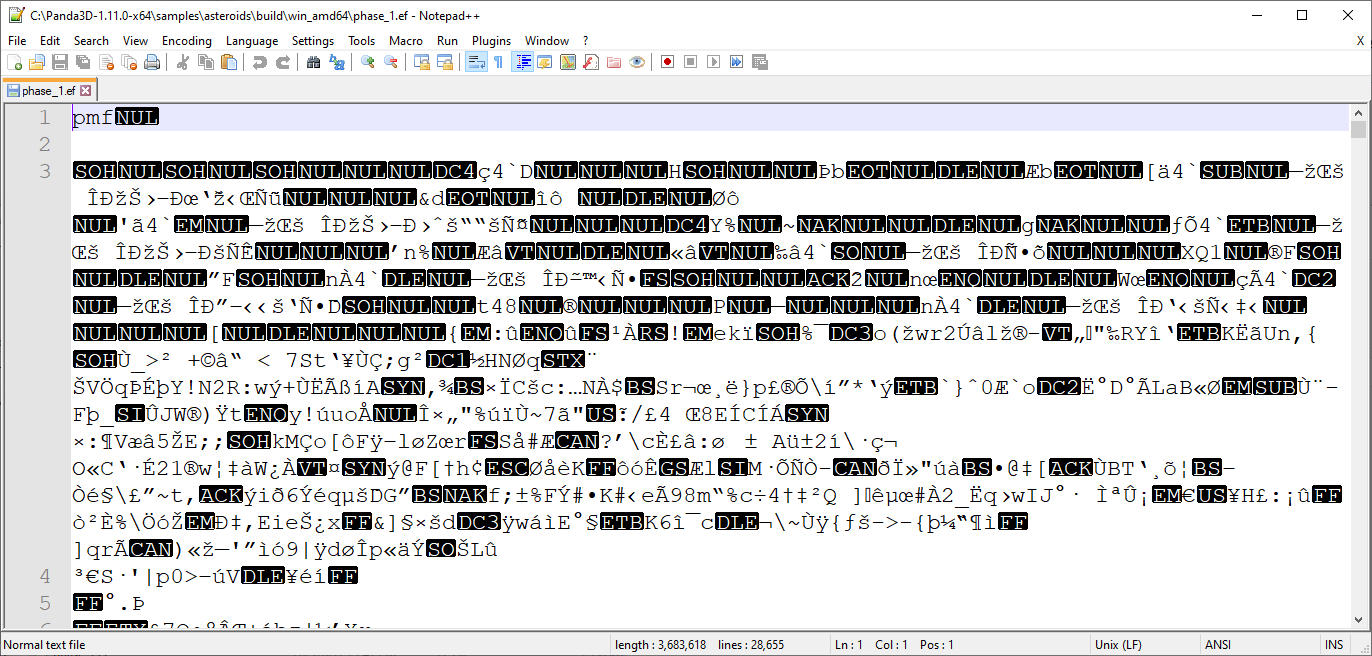
What is THIS supposed to mean?!
In order to try to understand this peculiar format, we’ll be using simple tables to try to understand how a typical multifile is packed. Once we understand the layout of a typical multifile, we’ll be using Python 3.9.2 with Panda3D installed (pip install panda3d) to read the metadata of a simple multifile with just two subfiles. To make things easier to understand, all offsets will be represented in decimal format (i.e. regular numbers).
Our test subject
Before we begin to disect the multifile format, let’s create a new multifile, so that we can try a few things out ourselves.
Create a new folder called phase_1, and create two new files inside this folder: note.txt and note2.txt.
note.txt should contain the following text: Your voice is my voice
note2.txt should contain the following text: Now and forever
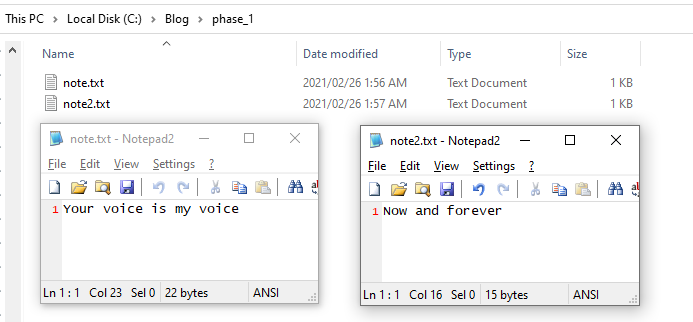
The structure of our example phase_1 folder
Open a command prompt in your phase_1 folder, and run the following command:
multify -c -f phase_1.mf note.txt note2.txt
You have successfully created our multifile test subject! Congratulations!
The overall format
Let’s begin! Each multifile that has been properly packed will have the following format:
| 1 | 2 | 3 |
|---|---|---|
| Multifile Header | Subfile Index Entries | Subfile Data |
As we can see, the first thing in a multifile will be the header of the multifile, followed by all the subfile index entries that exist within the multifile, and finally, the actual subfile data. This is assuming a properly packed multifile. In a multifile that has not been properly packed, the subfile index entries and the subfiles may easily be in a completely random order. However, even in multifiles that have not been properly packed, the multifile header is guaranteed to be followed by a subfile index entry. This allows us to traverse even those kind of multifiles easily.
Component 1: The multifile header
Let’s look at the multifile header next:
| Offset | Field | Value | Length | Explanation |
|---|---|---|---|---|
| 0 | Magic Number | char[6], always pmf\x00\n\r |
6 | A unique identifier that lets Panda3D know it’s dealing with a multifile. The \n\r at the end lets developers know when their binary multifiles are incorrectly treated as text files. |
| 6 | Major Version | int16, usually 1 |
2 | The major version of the multifile, this version is changed only when major changes are made to the format. |
| 8 | Minor Version | int16, usually 1 |
2 | The minor version of the multifile, this version is changed during incremental changes to the format. |
| 10 | Scale Factor | uint32, usually 1 |
4 | The scale factor of the multifile. This is used by a mechanism that allows multifiles to be larger than 4 GiB. If the scale factor is larger than 1, then the subfiles are evenly spaced out according to the scale factor, making it possible to index each multifile with a single 4 byte number. To make things simpler, we will only discuss multifiles with their scale factor set to 1. |
| 14 | Timestamp | uint32, Unix timestamp | 4 | The Unix timestamp of the multifile. This lets developers know exactly when a multifile was created or modified. |
Well, that isn’t so complicated, now is it? Let’s unpack this header! Open Python and run the following code:
from panda3d.core import *

f = open('phase_1.mf', 'rb')
dg = Datagram(f.read())
di = DatagramIterator(dg)

magic_number = di.extract_bytes(6)
major_version = di.get_int16()
minor_version = di.get_int16()
scale_factor = di.get_uint32()
timestamp = di.get_uint32()

print('Magic number', magic_number)
print('Major version', major_version)
print('Minor version', minor_version)
print('Scale factor', scale_factor)
print('Timestamp', timestamp)
The following will be outputted to your console (timestamps may vary):
Magic number b'pmf\x00\n\r'
Major version 1
Minor version 1
Scale factor 1
Timestamp 1614297912
This is exactly what we expected! We have a multifile with version 1.1.
Component 2: A typical subfile index entry
Let’s look at the subfile index entries next.
| Offset | Field | Value | Length | Explanation |
|---|---|---|---|---|
| 0 | Next Subfile Address | uint32 | 4 | This is the file offset that points to the next subfile index entry. We need to know this value in case our multifile is not properly packed. After we’re done reading this index entry, we’ll head HERE next! If this is 0, then the multifile contains no more subfiles. |
| 4 | Data Address | uint32 | 4 | This is the file offset that points to the actual subfile data. We need to know this value so we can extract our subfile. |
| 8 | Subfile Length | uint32 | 4 | This is the length of the subfile data. This contains the encryption and compression header data as well if the subfile is encrypted or compressed. |
| 12 | Subfile Flags | uint16 | 2 | These are all of the flags that are set on this subfile. Flags are basically special attributes. A list of all flags is provided below. |
| 14 | Original Length | uint32 | 4 | The original length of the subfile. This is how large the subfile is after decryption and/or decompression. This field only appears when the subfile is compressed or encrypted! |
| 14/18 | Timestamp | uint32 | 4 | The Unix timestamp of the subfile. This lets developers know exactly when a subfile was created or modified. If this is set to 0, then the timestamp of the multifile should be used instead. |
| 18/20 | Length of Name | uint16 | 2 | This is the length of the subfile’s name. It tells us how long the subfile’s name is. |
| 20/24 | Subfile Name | char[length] | length | This is the subfile’s name. The length of this name is provided by the 16-bit number we just read previously. All characters must be individually transformed using the following function: f(x) = 255 - x as they are obfuscated by Panda3D! |
Splendid! We can learn from this table that subfile index entries are stored as a linked list. In case you’re not aware what a linked list is, it’s a data structure that allows you to link together multiple objects together, by always telling the program the address of the next object.
Linked lists, explained

Let’s imagine a circle of kids. For simplicity’s sake, there are 4 kids in this circle. You’re a blindfolded person, trying to find all the kids that are part of the circle.
You approach the first kid, and ask his name. He replies: “Daniel”, and tells you that the next kid is to his left.
You approach the kid to his left, and ask her name. She replies: “Anna”, and tells you that the next kid is, once again, to her left.
You approach the kid to her left, and ask her name. She replies: “Halley”, but warns you that there’s an unoccupied hole in the circle to her left. “Please, skip that hole and go to the kid that’s 2 meters to my left.”
You then proceed to skip over that hole in the circle and approach the kid 2 meters to Anna’s left. You ask his name, and he replies: “Max”. He tells you: “Don’t worry, there is no next kid. You’ve visited all of us!”
Linked lists work the same way. You begin by reading the first object, and then continue by heading to the next object to read, until there are no more objects left to read.
Reading our first subfile index entry
Let’s try to read our two subfiles! Continue from the script that we ran previously:
def read_subfile(di):
    next_subfile_address = di.get_uint32()
    print('Next subfile address:', next_subfile_address)
    if next_subfile_address == 0:
        print('There are no more subfiles.')
        return
    data_address = di.get_uint32()
    subfile_length = di.get_uint32()
    subfile_flags = di.get_uint16()
    timestamp = di.get_uint32()
    name_length = di.get_uint16()
    subfile_name = di.extract_bytes(name_length)
    subfile_name = bytes([255 - x for x in subfile_name]) # Transform name using f(x) = 255 - x
    print('Data address:', data_address)
    print('Subfile length:', subfile_length)
    print('Subfile flags:', subfile_flags)
    print('Timestamp:', timestamp)
    print('Name length:', name_length)
    print('Subfile name:', subfile_name)

read_subfile(di)
The following appears on the terminal (timestamps may vary):
Next subfile address: 46
Data address: 79
Subfile length: 22
Subfile flags: 64
Timestamp: 1614297374
Name length: 8
Subfile name: b'note.txt'
What? Our subfile flags are set to 64? What does that mean? Otherwise, our subfile looks alright!
Subfile flags
Here’s the table of flags that may be used in relation to subfiles.
| Flag | Value | Explanation |
|---|---|---|
| SF_deleted | 20 ~ 1 | The subfile has been deleted from the multifile, so it should be ignored. |
| SF_index_invalid | 21 ~ 2 | The subfile has a corrupt index entry. |
| SF_data_invalid | 22 ~ 4 | The subfile has invalid data. |
| SF_compressed | 23 ~ 8 | The subfile is compressed. |
| SF_encrypted | 24 ~ 16 | The subfile is encrypted. |
| SF_signature | 25 ~ 32 | The subfile is a certificate, used to sign the multifile. |
| SF_text | 26 ~ 64 | The subfile is a text file, rather than a binary file. |
Our subfile flags were set to 64. We can find this value in the table: it is the flag SF_text. This flag was set when our multifile was created, because our note.txt file is in fact a text file, not a binary file. Cool, isn’t it?
Of course, flags can be combined. For example, if you’ve got a compressed and encrypted text file, then you would want the following flags: SF_compressed, SF_encrypted and SF_text. How would you set all of them? Just add them together! 8 + 16 + 64 = 88. The flag corresponding to a compressed and encrypted text file would therefore be 88.
Reading our second subfile index entry
Let’s read our next subfile, by going to the next subfile address, which is at 46:
di = DatagramIterator(dg)
di.skip_bytes(46)

read_subfile(di)
Our output is now:
Next subfile address: 75
Data address: 101
Subfile length: 15
Subfile flags: 64
Timestamp: 1614297441
Name length: 9
Subfile name: b'note2.txt'
Cool! We’ve got note2.txt now too! We’ve got both of our subfiles now.
But can we go beyond?
Still, let’s try to read another subfile, this time from the next subfile address: 75.
di = DatagramIterator(dg)
di.skip_bytes(75)

read_subfile(di)
Looks like we’ve reached the end of the multifile:
Next subfile address: 0
There are no more subfiles.
Component 3: Subfile data
As a matter of practice, let’s attempt to read the data of note.txt now. Recall that when we requested the subfile index entry for note.txt, we got the following output: Data address: 79 and Subfile length: 22. As such, to read note.txt, we want to skip 79 bytes from the beginning of the file, and then read 22 bytes.
di = DatagramIterator(dg)
di.skip_bytes(79)

data = di.extract_bytes(22)

print(data)
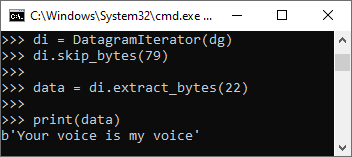
That’s exactly what we put inside note.txt! Great job!!!
Similarly, we could read note2.txt. If you want to challenge yourself, try reading note2.txt! All of the tools required are at your disposal. Good luck!
About encrypted multifiles
Ever since Sep 02, 2002, Panda3D supports the encryption of subfiles within multifiles. To make encryption possible, the engine leverages the OpenSSL toolkit. OpenSSL is a general-purpose cryptography library that provides various cryptographic primitives for easy use. This takes the implementation of these cryptographic primitives out of the hands of Panda3D’s maintainers, reducing the burden of maintenance and improving overall security.
Encrypted multifiles are multifiles that contain only encrypted subfiles. In a sense, they are meant to be completely unreadable. Only the game engine should be able to read those encrypted multifiles. But is that really true? Is the engine the only one that can read and decrypt those encrypted multifiles? You guessed correctly: if that really was the case, this post most likely wouldn’t exist.
Encrypted multifiles have been around for a long time, but they have seldom been used. It’s very rare to actually see an encrypted multifile in the wild! Multifiles are not encrypted by default, and it is always a conscious decision on the part of game developers to enable multifile encryption. These encrypted multifiles often have a special .ef extension, as opposed to the regular .mf extension. These .ef files have first appeared in actual usage in 2016, and their usage has since then died down. Modern games tend to forgo the multifile encryption process entirely, but there still exist a few Panda3D applications that, even now, use this specific .ef convention.
Encrypted multifiles are protected by a password that is first used to encrypt them before shipping the game, and then later used by the game engine itself to decrypt them. Decryption of game assets found within multifiles is done on-the-fly. This approach is favored as opposed to decrypting the entire multifile upon loading: after all, multifiles are designed to be mounted to Panda3D’s virtual file system. Unpacking the entire multifile upon loading would greatly impact loading times, memory usage, and also potentially hard disk usage, depending on the tentative implementation.
Given that multifiles must be decrypted somehow on the client side, the client has to have access to the password at some point. If multifiles were unpacked entirely upon loading, the password could easily be discarded after the multifile load. This would improve security somewhat, and is an often suggested technique. Of course, it is not infallible: a simple debugger could be used to halt execution of the program as soon as the multifile begins loading. However, since Panda3D decrypts multifiles on-the-fly, it needs to keep the encryption password in memory indefinitely.
Therefore, encrypting multifiles provides only a false sense of security through obscurity. Because the client has access to the password at at least one point, anyone dedicated enough can easily extract the password either:
- from the runtime code using static analysis of the executable (by reversing the password generation algorithm)
- using static analysis combined with instruction patching using codecaves (by intercepting the encryption password setter function)
- using a debugger (by interrupting execution within the encryption password setter function and dumping the call stack)
- or by dumping the memory during execution.
The first option is the most complicated. Since most Panda3D games are written in Python, attempting the first option would require you to:
- learn how the application’s bytecode is packed
- figure out the bytecode layout
- dump the bytecode using the layout
- make sense of the bytecode, which might be non-standard
- and reverse engineer the original function.
The second and third options are amongst the easiest, but they still require the usage of special tools that are subjectively difficult to learn. These options also require multiple steps, and messing up a single step would result in failure. They also require per-game disassembly and basic knowledge of reverse engineering. As such, the last option is the easiest to realize for a beginner - extracting the password from the application’s memory during execution. However, we will also discuss the first option, albeit not in great detail.
Why encrypt multifiles?
This is an easy topic to cover. Traditionally, multifiles have not been encrypted. However, the following concerns can lead a game developer to encrypt their multifiles:
Preventing exploits
As mentioned before in this article, hackers may abuse the multifile system to their own benefit. Having access to a game’s multifiles would allow them to modify the models that make up the game world. However, thanks to cryptographic signing, encrypting multifiles is no longer necessary to prevent hackers from exploiting your game. Signatures are specific to a single multifile, and editing the multifile in any way would break the signature. Multifiles with broken signatures are not loaded by the game. In addition to this, content packs can be implemented as to only allow visual or auditory effects to be modified, leaving all custom, unsigned and potentially dangerous models out of the virtual file system.
Hiding unreleased features
A game developer might want to hide their unreleased features. As such, they will encrypt their multifiles, making sure that their players cannot have a glance at their assets. This is unnecessary, however, and is not the right approach in the first place. Data miners have always existed, and will always exist. People will find a way to access your content, and the only way to protect it is to follow proper Git version control branching best practices. By employing a successful branch workflow, your unreleased features will never make it into production.
Preventing unauthorized usage of game assets
Some game developers have grown paranoid that their game assets will eventually be stolen and used to create exact copies of their games. This paranoia stems from the years between 2013 and 2017, a notorious time period in which novice developers took the game assets of already existing games, and used them to create copies of games, only changing the name of the game and other miscellaneous details. Coincidentally, this is also the same time period in which encrypted multifiles became a topic of discussion.
Nowadays, the fad of creating copy-paste projects has largely died down. Most of this can be attributed to the fact that the novice developers that were largely responsible for this phenomenon have since then matured and turned into knowledgeable individuals, leading to a complete paradigm shift in thinking. Some projects, however, still employ encryption. Most of them do so simply because their multifile loading systems were created in this time period, and has not been revised since.
Focus has also mostly shifted to creative work, rather than simply just programming. Nowadays, creative people are more popular than their programmer counterparts. Channels such as Smokin' Foreman and ToontownDock are very popular amongst players. Creators create content using existing game assets as their base. Without access to game assets, they cannot create their videos.
The usage of encrypted multifiles leads to a scenario in which game assets are treated as a luxury. Ordinary people do not have access to these game assets. Rather, only popular creators with well-established connections can ever access those assets. This leads to a Partner Program-esque situation in which only a select few are allowed to create content, and the rest’s work is severely hindered by the lack of support. Attempting to help these unprivileged creators often leads to being bullied into submission by game developers.
Characteristics of encrypted subfiles
Encrypted subfiles are similar to regular subfiles, but their format is a bit different.
We can observe the following differences:
- Encrypted subfiles have one extra binary field: Original Length, which is the original length of the subfile. This marks the size of the subfile after decryption in bytes.
- Encrypted subfiles have the following subfile flag set at all times:
SF_encrypted(24 ~ 16) - Encrypted subfile data contains more than just subfile data: it contains its own encryption header, which holds information about the algorithm used to encrypt the subfile.
The encryption header
All encryption subfile data is preceded by the following encryption header:6
| Offset | Field | Value | Length | Explanation |
|---|---|---|---|---|
| 0 | Encryption Algorithm NID | uint16 | 2 | The NID (numeric identifier) of the algorithm used to encrypt this subfile. By default, Panda3D encrypts all subfiles using the Blowfish algorithm in CBC mode (bf-cbc), which has an NID of 91. NIDs are specific to OpenSSL, and may be converted to an ASN1 object using the OBJ_nid2obj function in OpenSSL. |
| 2 | Key Length | uint16 | 2 | The key length of the encryption key that is derived from the encryption password. By default, this is 16, meaning that Panda3D encrypts subfiles using 16 byte long keys. |
| 4 | Key Iteration Count | uint16 | 2 | The number of times that the password is hashed to generate the key when encrypting, divided by 1000. For example, if this value is 10, then the password is hashed 10000 times to generate the key. A value of 0 means that the password is only hashed once. The higher this value is, the more time it takes to brute force the password. |
| 6 | Encryption Magic | char[6] | crypty | The first block of the encrypted data begins with the string literal: crypty. We can use this string literal to test if our decryption succeeded. If we decrypt an encrypted subfile, and it begins with the string literal crypty, then that means our password can be considered correct. |
| 12 | Encrypted Data | char[n] | n | The continuation of the encrypted data block stream. To an outsider, this just looks like a random stream of bytes. However, decrypting the encrypted data allows us to peek inside the subfile. |
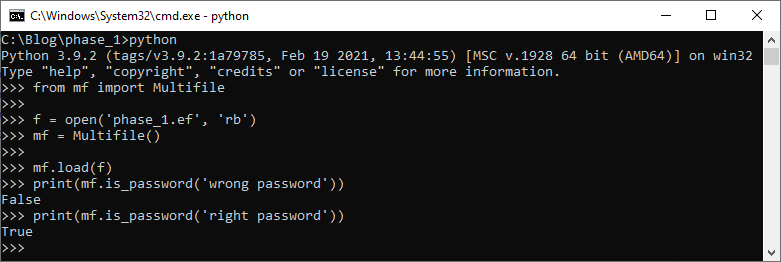
Verifying passwords
Let’s assume that we have an encrypted phase file alongside a potential password. How do we know if that password is correct? How do we know if that password can unlock the given multifile?
The easiest way is to try to decrypt the multifile using the multify.exe tool:
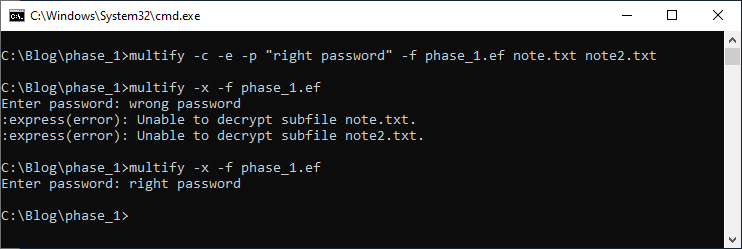
Decrypting a phase file with the wrong password will yield an error, but decrypting a phase file with the right password will result in the multifile being extracted to your hard disk.
The second, more in-depth way to validate an encryption password is to try to decrypt a single subfile from the multifile. After decryption, if the decrypted data begins with the string literal crypty, then the password is correct. If the decrypted data does NOT begin with the string literal crypty, then the password is incorrect.
Feel free to use the multifile class I’ve created and shared on GitHub to test this behavior:
Panda3D Encryption Demo: Sample program with an encrypted multifile
For the purpose of this article, we’ll be using the following sample program, which includes a single encrypted multifile: phase_1.ef.
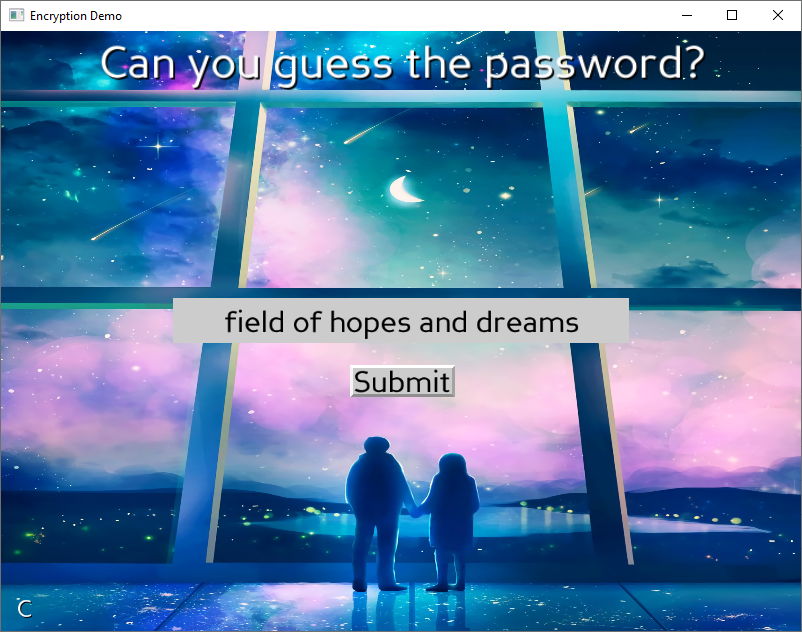
Panda3D Encryption Demo - phase_1.ef
The source code is available on GitHub. Please download the built sample program from the latest GitHub release page. Extract encryption-1.0.1_win_amd64.zip, and run encryption.exe to start the sample.
Your task is the following: Find out the password that was used to encrypt phase_1.ef, and decrypt the multifile! There’s an input box you can use to check whether your guess is correct or not.
Obviously, if you’re just trying to guess the password… well, see you in two hundred years! We’re going to be taking a more sensible approach.
Keep in mind that our sample program was compiled using MSVC 2019 (Visual Studio 2019), targeting the x64 architecture! Some of the offsets used in the last part of this article are specific to this compiler and architecture, and will not work on applications that use an older compiler or a different architecture. It is up to you, the reader, to port these offsets over to your target environment.
Finding the encryption password setter function with IDA Pro
As mentioned before, we can attempt to perform static analysis on the binary. However, encryption.exe is not the only binary present in the extracted folder. In fact, encryption.exe is just responsible for wrapping the Python and Panda3D runtimes.
We’d like to analyze the library that actually contains the code responsible for setting the encryption password. Let’s take a look at the source code for set_encryption_password first:
INLINE void Multifile::
set_encryption_password(const std::string &encryption_password) {
  if (_encryption_password != encryption_password) {
    if (!_new_subfiles.empty()) {
      flush();
    }
    _encryption_password = encryption_password;
  }
}
This tells us a few things about the set_encryption_password method. First of all, it’s an INLINE function. This means that, when it’s compiled to machine code, it will not have its own function. Rather, it will be directly built into any function that calls it. This makes things more complicated for us, because we can’t just simply find the set_encryption_password method inside the binary. There’s no one singular method built into the binaries for setting the password. Rather, we’ll need to find all the different instances that set_encryption_password is called in. Or, at least, we need to find the instances that actually matter for us. Secondly, it would be difficult to find this method if all it did was set a string in memory. But it also calls the Multifile::flush() method if the new subfile list is empty. This is easy to look out for, so finding the method will be way easier if we mainly look for calls to the flush method.
What we’re most interested in are the Python -> C++ bindings. Panda3D’s Interrogate system automatically generates Python bindings for all C++ methods that are published. And set_encryption_password just so happens to be published! In fact, our sample program even calls it. That’s how it sets the encryption password for the phase_1.ef file. Let’s take a look at the automatically generated Python bindings for set_encryption_password in libp3express_igate.cxx! Most likely, we will be able to intercept this method to figure out the encryption password.
/**
* Python function wrapper for:
* inline void Multifile::set_encryption_password(std::string const &encryption_password)
*/
static PyObject *Dtool_Multifile_set_encryption_password_494(PyObject *self, PyObject *arg) {
Multifile *local_this = nullptr;
if (!Dtool_Call_ExtractThisPointer_NonConst(self, Dtool_Multifile, (void **)&local_this, "Multifile.set_encryption_password")) {
return nullptr;
}
Py_ssize_t param1_len;
const char *param1_str = PyUnicode_AsUTF8AndSize(arg, ¶m1_len);
if (param1_str != nullptr) {
((*local_this).set_encryption_password)(std::string(param1_str, param1_len));
return Dtool_Return_None();
}
if (!_PyErr_OCCURRED()) {
return Dtool_Raise_BadArgumentsError(
"set_encryption_password(const Multifile self, str encryption_password)\n");
}
return nullptr;
}
JACKPOT! We have a string literal. Multifile.set_encryption_password. String literals are the easiest way to find a specific function, as you can just follow its cross-references in the machine code. Let’s open up IDA Pro, and start disasembling panda3d.core.pyd, the Python -> C++ bindings for panda3d.core, the package containing the Multifile class. Open up the Strings window in IDA Pro using Shift+F12 and search for our string literal, Multifile.set_encryption_password!
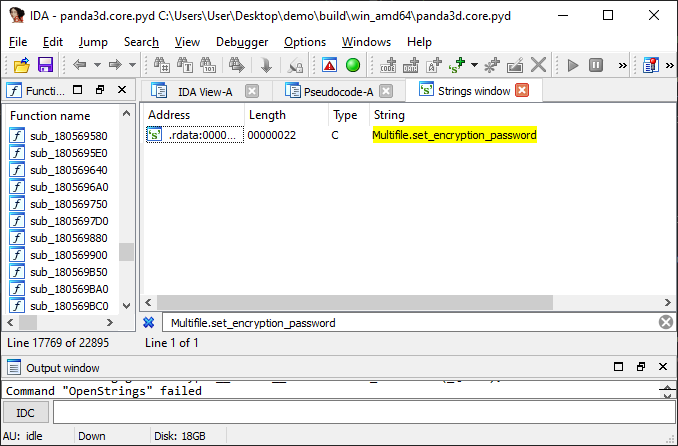
The multifile string literal, found in the sample binary
Double click on the string literal. This will open up the IDA View-A tab. Right click on the aMultifileSetEn_0 label, and press List cross references to…
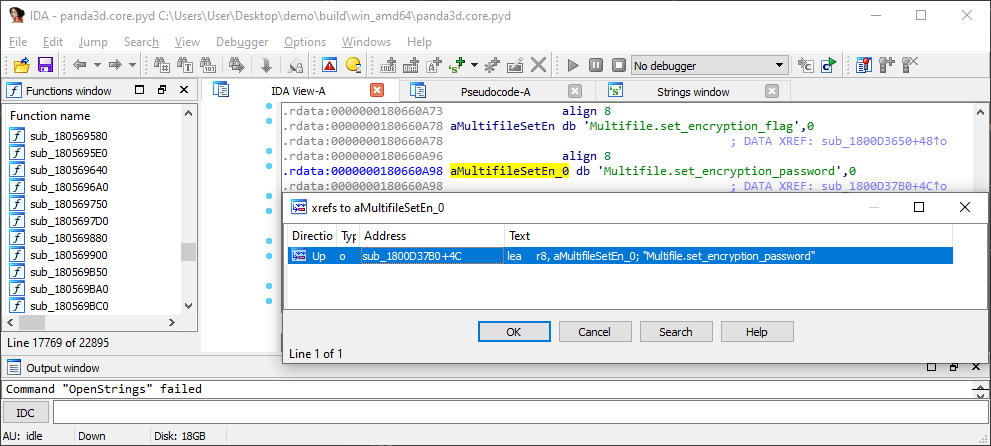
IDA lists all the references to this string literal.
The only reference is our target function. Double click on the cross-reference. This will bring you to the graph that describes the execution flow of the function:
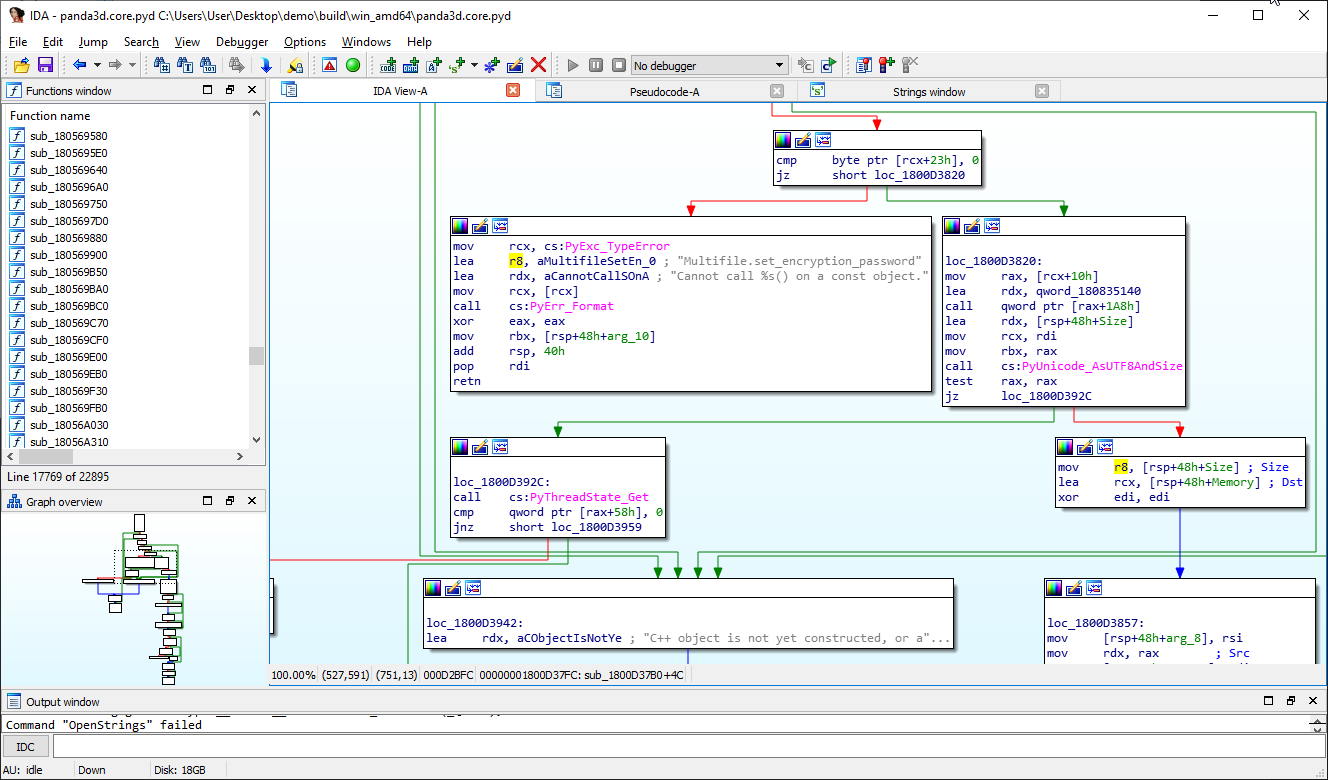
This is the function we’ve been looking for!
Press F5 to begin decompiling the function to pseudocode:
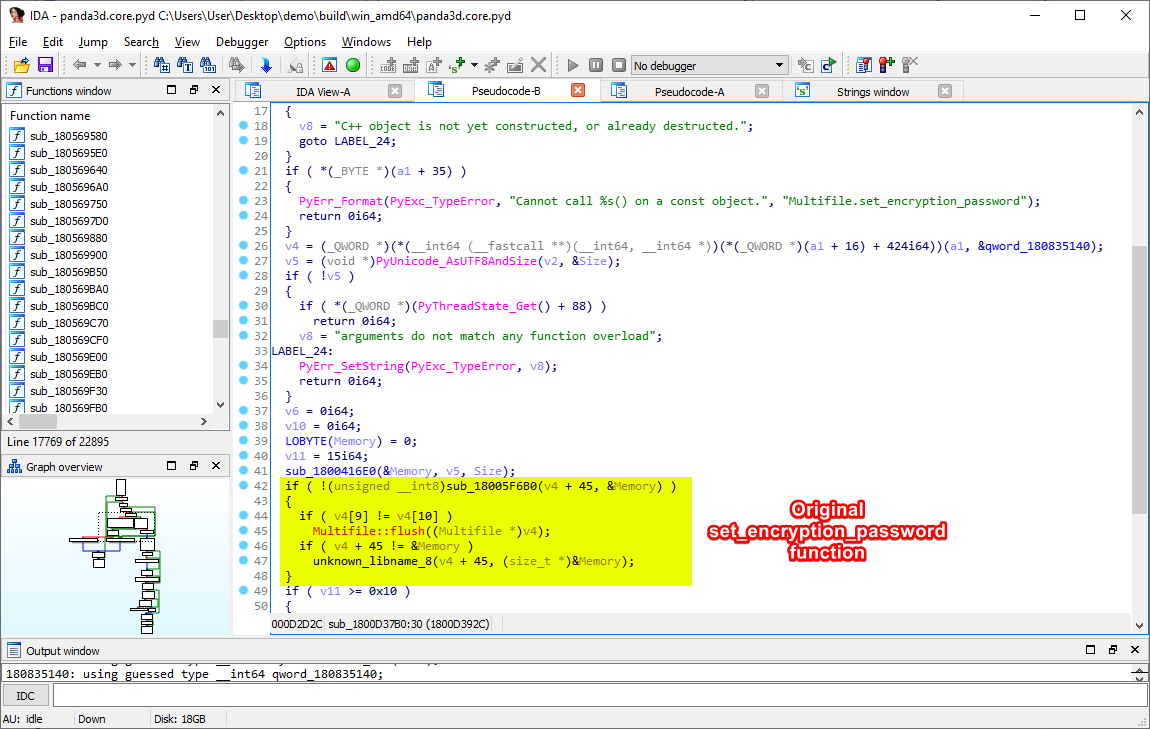
The disassembled pseudocode. Here is the function that sets the encryption password in the memory!
Now that we know exactly where the method that sets the encryption password is, we could do many interesting things. For instance, we could search for some unused bytes in the binary to insert a codecave at, so that we could create a relative jump from the original set_encryption_password to our codecave, and, for example, execute printf on v4 + 45 inside the codecave before jumping back to the original function. Or, we could use a debugger to create a breakpoint at this point of the execution, and extract the value of v4 + 45. However, these approaches are all dependent on the game binary itself (there may also be anti-debugger checks present in a binary), and as such, we will instead explore a game binary independent method to extract encrypted multifile phase files: memory scanning.
Memory scanning as a means to extract multifile passwords
Memory scanning is an interesting technique, first popularized by the ubiquitous Cheat Engine. Cheat Engine enables any user to inspect values inside a process’s memory. After inspecting the process’s memory, you can choose which bytes to edit and/or freeze.7 Cheat Engine was revolutionary because it came with an easy-to-use graphical user interface. As such, the barrier to entry to memory scanning was turned next to minimal.
Memory scanning is a technique that explores the memory of a given process. By scanning memory, you are looking for certain values of interest in the process memory. In our case, we want to find multifile passwords in the memory. Unfortunately for us, passwords may appear anywhere in the memory of the application. It’s not even guaranteed to be an ASCII human readable string: OpenSSL accepts even byte-strings for password derivation.
So, instead of outright looking for multifile passwords, we should look for multifile objects in the memory. After all, if we find a multifile object in the memory, we can easily figure out exactly where it stores its password. In the end, the best approach is to work backwards: if we can find the multifile’s name (a well-known value) in the memory, we can then figure out where its multifile object is stored. After we find its multifile object, we can then easily read the encryption password associated with the multifile.
What is memory?
Memory is one of the most important components in your computer. RAM gives applications a place to store and access data on a short-term basis. Furthermore, it also gives application a place to save their executable code for their lifetime, preventing the computer from thrashing the hard disk just to execute a simple application.
The memory contains everything that an application needs for its calculations. Naturally, this includes the encryption passwords for all currently loaded encrypted multifiles. This turns the memory into a very appetizing target for us, as we would like to learn how to extract these passwords from the application, hopefully without having to reverse engineer the application itself.
Memory can be addressed using either 4 or 8 byte long numbers. Usually, these numbers are in hexadecimal format. On a 32-bit architecture, memory is addressed using 4 byte numbers, and on a 64-bit architecture, memory is addressed using 8 byte numbers. Our sample application is built for a 64-bit architecture (x64), so we’ll be using 8 byte long numbers to address our memory.
The best analogy for addressing memory is the Great Wall of China. Imagine the Great Wall of China.

The Great Wall of China, colorized
It is the longest man-made wall ever, with a main length of 3460 kilometers. Imagine that there are guard towers on the Great Wall of China. Each guard tower is numbered, beginning from 1. This is the memory address. If you know that a guard tower’s index is 26, then you know that it is the 26th tower. Each tower contains a guard, with a piece of paper in his pocket. On the piece of paper is always a number from 0 to 255. That number is the value at that specific memory address.
So if you were to ask: “What is the value at memory address 26?”, you are basically asking: “What’s the value on the 26th tower’s guard’s piece of paper?” And the answer to that question is always a number from 0 to 255: a single byte.
What is a pointer?
Pointers sound very confusing at first, but they’re actually a quite simple concept. Pointers are simple numbers. They’re 4 bytes long on a 32-bit architecture, and 8 bytes long on a 64-bit architecture. Chances are you are using a 64-bit architecture right now. Their name alludes to their true purpose: they point to memory. Pointers are memory addresses. If you have a pointer, you can then head to that point in memory and read as much memory as you want from that offset.
Class memory layouts in C++
Thankfully, instances of all classes in C++ have very well-defined memory layouts. The memory layout is determined by the following:
- The compiler. MSVC 2017 and MSVC 2019 are ABI compatible with each other, and as such, classes compiled using MSVC 2017 and classes compiled using MSVC 2019 have the same memory layout. However, a class compiled using another compiler, such as Clang, GCC, or MSVC 2015 will have a different memory layout. We’ll be assuming a MSVC 2019 compiler memory layout for all classes from now on.
- The architecture. x86 and x64 architectures have different pointer type sizes. Certain types, such as
std::string, also have different layouts on x86 and x64. From now on, we’ll be assuming a x64 memory layout for all classes. - The class declaration. Every class is defined inside a header file (
*.h). The order of the class members, as well as the sizes of the class members dictate the memory layout of the class. If you swap a class member with another, their actual positions in memory are switched after compilation. We know the memory layout of the Multifile class because Panda3D’s source code is completely open source.
To understand exactly how memory layouts work, and to find out exactly how to determine the exact memory layout of a C++ class, we are going to create our own C++ class and try to figure out its memory layout.
Consider the following C++ code (mixed with C code, in order to reduce the amount of included classes for the purpose of this article):
#include <stdio.h>

class TestClass {

public:
    int first;
    int second;
    int third;
};

int main() {
    TestClass *test = new TestClass;
    test->first = 4;
    test->second = 2;
    test->third = 9;

    printf("Size of TestClass instance: %llu\n", sizeof(*test));
    printf("TestClass memory:\n\n");

    unsigned char *memory = (unsigned char *) test;

    for (int i = 0; i < sizeof(*test); ++i) {
        printf("%u ", memory[i]);
    }

    printf("\n");
    return 0;
}
Save the code provided above as classTest.cxx. Note how our new custom class is called TestClass, and it has three class members: first, second and third, all three being int types (4 byte numbers). The first class member will be set to 4, the second to 2, and the third to 9.
Open your x64 Native Tools Command Prompt for VS 2019, and compile classTest.cxx with the following command:
cl /d1reportAllClassLayout classTest.cxx
Note that we’re using the /d1reportAllClassLayout command line option of cl.exe, the official Microsoft Visual C++ compiler. This is an undocumented feature of the Visual C++ compiler front-end, meaning that it is not supported, and not advertised by Microsoft in any way or capacity.8 Regardless, it is very useful for engineers who work with memory dumps on a daily basis, as using this command line option allows you to see the entire memory layout of all classes encountered during compilation.
Not only will cl compile our program into an executable called classText.exe, but it will also share with us the memory layout of TestClass, our custom class:
class TestClass size(12):
        +---
 0      | first
 4      | second
 8      | third
        +---
Wow! Is it really that simple? Yes, it is. More complicated classes will have automatic alignment adjustments, but that is of little concern to us: the important bits are the offsets, the numbers that appear in the first column of the memory layout.
For example, if you know that a class begins at, for example, 0x00005210 in your memory, and you want to read the memory of the class member named second, then first, you’ll need to begin at the memory address 0x00005210, skip 4 bytes (equal to the offset of second) to 0x00005214, and read 4 bytes at that address (equal to the size of second, which is an int, a 4 byte number).
Since our class instance is allocated using the new operator, the class instance is saved in the heap, a special area of the memory dedicated to long-living objects. It is not lost when the function that created the class instance ends. Multifiles are allocated in Panda3D in exactly the same way, so our access to this data is guaranteed.
Run classText.exe in your Command Prompt for the following output:
Size of TestClass instance: 12
TestClass memory:

4 0 0 0 2 0 0 0 9 0 0 0
This means that our compiler was right: TestClass’s size is indeed 12, the first 4 bytes are used by the class member named first (set to 4), the second 4 bytes are used by the class member named second (set to 2), and the last 4 bytes are used by the class member named third (set to 9).
std::string internals
Before we go any further, we must talk about std::string. This container is going to be crucial to our research from now on. Each std::string stores characters. For example, if you want to represent the following text: “I love my internet friends”, you would need to store this data in an std::string.
An std::string is a data container that always takes up 32 bytes of memory in our MSVC 2019 x64 environment. But how come it always takes up 32 bytes of memory? “I love my internet friends” should only be 26 bytes long, no? What if I want to store something longer, like “Great expectations of sun rays and bright days”? That is 46 bytes long, how come it fits in a 32 byte long container?
It turns out that std::string is a very clever data container. It acts differently based on how long your string is.
If your std::string is shorter than or equal to 16 characters, then the first 16 characters are used to store the string as-is, while index 16 to index 24 is used to store a 8 byte long length. This is called Small String Optimization, and is yet another undocumented MSVC feature. All compilers implement some sort of Small String Optimization, but these implementations differ between compilers. There is almost no information on MSVC’s SSO on the internet, but it’s fairly easy to figure the format out.
For example, let’s encode the following string: Blood of Villain. Encoded as std::string, Blood of Villain manifests in the memory as such:
| 0 | 1 | 2 | 3 | 4 | 5 | 6 | 7 | 8 | 9 | 10 | 11 | 12 | 13 | 14 | 15 | 16 | 17 | 18 | 19 | 20… |
|---|---|---|---|---|---|---|---|---|---|---|---|---|---|---|---|---|---|---|---|---|
| B | l | o | o | d | o | f | V | i | l | l | a | i | n | 0x10 | 0x00 | 0x00 | 0x00 | 0x00 |
The first 16 characters are used to store the string, while the bytes from 16 to 24 are used to store the length, which is simply 0x10, or 16 in this case.
HOWEVER, if your std::string is longer than 16 characters, then the first 8 characters are used to store a pointer to the actual string data. Your ACTUAL string data will be saved elsewhere in the memory. The length of the string is still saved between the 16th and 24th indices.
What happens if we encode the following string: We are long strings? Our std::string might look something like this:
| 0 | 1 | 2 | 3 | 4 | 5 | 6 | 7 | … | 16 | 17 | 18 | 19 | 20… |
|---|---|---|---|---|---|---|---|---|---|---|---|---|---|
| 0x00 | 0x00 | 0x00 | 0x00 | 0x43 | 0x50 | 0xAB | 0xEF | … | 0x13 | 0x00 | 0x00 | 0x00 | 0x00 |
You might’ve noticed that the first 16 characters no longer represent ASCII data. In fact, the first 8 bytes constitute a pointer. Let’s head to 0x000000004350ABEF, the 64-bit memory address encoded in the first 8 bytes of this std::string, and read 0x13 characters (19 characters, equal to the length of We are long strings.) The exact value at this address is We are long strings!
The Multifile memory layout
Now that we’ve learned how to figure out a class’s memory layout, let’s use our newfound knowledge on the multifile.cxx file. Our target is the Multifile class! Execute the following command in panda3d/panda/src/express:
cl /d1reportAllClassLayout multifile.cxx -I../../../built_x64/include > classes.txt
This will save a LOT of class layouts to a file called classes.txt. Open classes.txt and search for class Multifile size.
Multifile layout
class Multifile	size(1704):
	+---
 0	| +--- (base class ReferenceCount)
 0	| | {vfptr}
 8	| | +--- (base class MemoryBase)
	| | +---
 8	| | _ref_count
16	| | _weak_list
	| +---
24	| ?$ov_set@PEAVSubfile@Multifile@@V?$IndirectLess@VSubfile@Multifile@@@@V?$pvector@PEAVSubfile@Multifile@@@@ _subfiles
64	| ?$pvector@PEAVSubfile@Multifile@@ _new_subfiles
96	| ?$pvector@PEAVSubfile@Multifile@@ _removed_subfiles
128	| ?$pvector@PEAVSubfile@Multifile@@ _cert_special
160	| ?$pvector@V?$pvector@VCertRecord@Multifile@@@@ _signatures
192	| ?$fpos@U_Mbstatet@@ _offset
216	| _read
224	| _write
232	| _owns_stream
  	| <alignment member> (size=7)
240	| ?$fpos@U_Mbstatet@@ _next_index
264	| ?$fpos@U_Mbstatet@@ _last_index
288	| ?$fpos@U_Mbstatet@@ _last_data_byte
312	| _needs_repack
  	| <alignment member> (size=7)
320	| _timestamp
328	| _timestamp_dirty
329	| _record_timestamp
  	| <alignment member> (size=6)
336	| _scale_factor
344	| _new_scale_factor
352	| _encryption_flag
  	| <alignment member> (size=7)
360	| ?$basic_string@DU?$char_traits@D@std@@V?$allocator@D@2@ _encryption_password
392	| ?$basic_string@DU?$char_traits@D@std@@V?$allocator@D@2@ _encryption_algorithm
424	| _encryption_key_length
428	| _encryption_iteration_count
432	| IFileStream _read_file
768	| IStreamWrapper _read_filew
816	| OFileStream _write_file
1144	| FileStream _read_write_file
1488	| StreamWrapper _read_write_filew
1576	| Filename _multifile_name
1664	| ?$basic_string@DU?$char_traits@D@std@@V?$allocator@D@2@ _header_prefix
1696	| _file_major_ver
1700	| _file_minor_ver
	+---
This is the Multifile class layout on MSVC 2019, x64 architecture as of Feb 27, 2021.
Filename layout
class Filename	size(88):
	+---
 0	| ?$basic_string@DU?$char_traits@D@std@@V?$allocator@D@2@ _filename
32	| _dirname_end
40	| _basename_start
48	| _basename_end
56	| _extension_start
64	| _hash_start
72	| _hash_end
80	| _flags
  	| <alignment member> (size=4)
	+---
This is the Filename class layout on MSVC 2019, x64 architecture as of Feb 27, 2021.
Proposed angle of approach
Our goal is to extract the password of phase_1.ef from the memory of our sample project. We’re going to be employing memory scanning, following these steps:
Step one: Search for all instances of phase_1.ef in the memory
Scanning for all instances of phase_1.ef in our process’s memory allows us to find all potential Filenames that might have been allocated as the filename of the mounted multifile.
Note that figuring out where the phase name is allocated in memory does not give us a direct path to the Multifile object. If our multifile filename is longer than 16 characters, we still need to figure out every single point in memory where a cross-reference appears, thanks to MSVC’s Small String Optimization.
Step two: Figure out the beginning address of the Filename
Alright, now we’ve found all instances of phase_1.ef in our memory. Let’s try each one of them individually.
Chances are, however, that the multifile’s full filename is NOT just phase_1.ef! If the multifiles are stored in a different folder, for example in a folder named resources/phase_1.ef, then we need to find the entire filename as stored in memory.
To accomplish this, we’ll be peeking behind and ahead of the string that we’ve just found. 128 bytes should be enough of a peek window. If we read 128 bytes before phase_1.ef in memory, then we’ll also read the resources/ portion. After that, we just need to run a simple trimming algorithm: beginning from phase_1.ef, walk behind the string until you encounter a non-ASCII character. Peeking behind will reveal 50% of the full string: resources/phase_1.ef.
If we read 128 bytes after phase_1.ef in memory, chances are that we won’t find any new characters. But what if we accidentally searched for phase_1.e? Just to be sure, we’ll be peeking ahead of the string as well. Similarly to what we’ve done just a second ago, walk ahead of the string until you encounter a non-ASCII character. Peeking ahead will reveal the rest of the full string: resources/phase_1.ef, even if you’ve been looking for phase_1.e this entire time.
Now, we have the full string: resources/phase_1.ef. The memory address of the first letter, r, denotes the memory address at which this string was allocated.
Step three: Find our Multifile object in memory
The next step consists of finding the Multifile object in memory. We’ll be using the _multifile_name class member of the Multifile class, as a sort of gateway into the Multifile object. If we can find where the Filename that allocated the string we found in step two is, then we’ve practically found the Multifile object already.
There are two cases:
- The string we found in step two is shorter than or equal to 16 characters, and is not subject to Small String Optimization
- The string we found in step two is longer than 16 characters, and is subject to Small String Optimization
If the string we found is shorter than or equal to 16 characters, then congratulations! The address at which the string was allocated is the same address of the Filename inside the Multifile class, with a relative offset of 1576.
If the string we found is longer than 16 characters, then we’ve surely got our work cut out for us. The address at which the string was allocated is certainly not the address of the Filename object we’ve been looking for!
Search through all memory again for the memory address of the string. Each cross-reference to the memory address of the string is a potential Filename object inside the Multifile class, with a relative offset of 1576 once again.
Step four: Confirm that we’ve found a Multifile object
So far, we’ve only found potential Multifile objects. To make sure that our potential Multifile objects are actual Multifile objects, we should try to identify them somehow. The easiest way would be to check their major and minor versions.
Currently, Panda3D multifiles are version 1.1. If a potential Multifile object’s version is also 1.1., then it is very likely that we are dealing with an actual Multifile object.
Since our entry point right now is the Filename object inside the Multifile class, that means that we are at an offset of 1576. The major version is available at an offset of 1696, while the major version is available at an offset at 1700. Simply navigate 1696 - 1576 = 120 bytes forward in the Multifile, and read 4 bytes for the major, as well as 4 bytes for the minor version. If both of them are equal to 1, then we are dealing with an actual Multifile object.
Step five: Extract the encryption password from the Multifile object
We’ve found our Multifile object! Our entry point is the Filename object inside the Multifile class: _multifile_name, at an offset of 1576 bytes. Our target is the _encryption_password class field:
360	| ?$basic_string@DU?$char_traits@D@std@@V?$allocator@D@2@ _encryption_password
392	| ?$basic_string@DU?$char_traits@D@std@@V?$allocator@D@2@ _encryption_algorithm
_encryption_password can be found at an offset of 360, so we need to walk 1576 - 360 = 1216 bytes backwards in order to read the encryption password, encoded as an ?$basic_string@DU?$char_traits@D@std@@V?$allocator@D@2@.
A what now?!?!
Let’s use an online C++ demangler to figure out what that means. So, apparently that’s an std::basic_string<char, std::char_traits<char>, std::allocator<char>>. Huh. That’s still a weird name. I think std::string sounds nicer!
Recall the structure of std::string objects. The 16th to 24th characters signify the length of the std::string. This should be the very first thing we read, as we need to find out if Small String Optimization is in play or not.
If the length of the encryption password is less than or equal to 16, then that makes things easier! Just read the string at offset 360, and there you have it: the encryption password, in plain text format.
However, if the encryption password is longer than 16 characters, then the first 8 bytes encode a pointer pointing to the actual encryption password. Read these 8 bytes as a pointer, head to the memory address encoded by this pointer, and read the string there. The encryption password stares you down.
Victory!!!
An implementation of this algorithm exists in the P3Dephaser GitHub repository. Feel free to peruse the code at your own discretion!
Introducing P3Dephaser: A GUI application to extract multifile passwords
Panda3D Dephaser is a proof-of-concept GUI application that extracts multifile passwords from any Panda3D game runtime compiled using MSVC 2019 and the x64 architecture.

The source code of P3Dephaser is available on GitHub for tinkerers and the like.
End users may download the prebuilt version of P3Dephaser from the GitHub releases page.
How to use P3Dephaser
To demonstrate the usage of P3Dephaser, we’ll be using Panda3D Dephaser in tandem with the Panda3D Encryption Demo.
Extract the Panda3D Encryption Demo to a new folder and run encryption.exe. The following demo application will boot up:
The Panda3D Encryption Demo sample program.
Your task is to guess the password of the encrypted multifile phase_1.ef shipped with the application. Of course, this is a daunting task in and out of itself. But with P3Dephaser, even this is a simple task.
Open P3Dephaser.exe. The Panda3D Dephaser will appear. Search for the process named encryption.exe (this is our Panda3D Encryption Demo) and select it with your cursor.
After choosing the process, you may now proceed to enter the name of the encrypted multifile: phase_1.ef
Press the Scan button, confirm that you are indeed scanning for the right multifile, and press Yes to begin the extraction process. It will take a few seconds, but the password will appear in the app’s table!
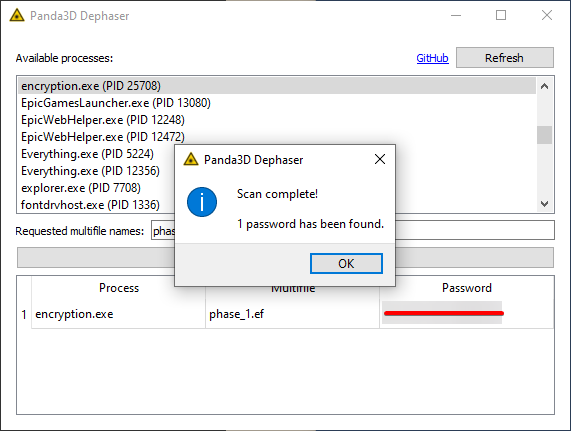
The password is easily found by the PoC tool.
Enter this password into the Panda3D Encryption Demo, and it should bring you to a special screen, meant to be seen by only those who have succeeded in decrypting the demo:

The congratulations screen is blurred for now. You should try the challenge for yourself if you’re curious!
Also decrypt and unpack the encrypted multifile using Panda3D’s built-in tools:
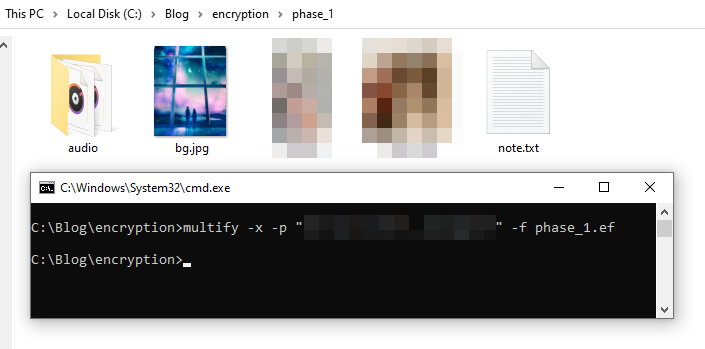
The extracted password is the correct password.
Concluding notes
The multifile format is a really versatile format. Its creation made a lot of games possible. Without the multifile system, Panda3D games most likely wouldn’t be doing as well as they are today! Multifiles paved the way for the creation of early MMORPGs, even when their existence was endangered by the then-slow Internet.
However, encrypted multifiles provide a false sense of security to any game developer using them. Encrypted multifiles can be decrypted, and they can be decrypted easily. All that’s necessary to defeat security through obscurity is somebody with the proper knowledge and enough time on their hands.
Data Structure Layout Randomization is not yet mature enough for actual usage in the field. As of Feb 27, 2021, it only exists in academia.9 The usage of DSLR has also failed in real-world use cases. In 2017, the randomization of the task_struct struct layout was recommended by Kees Cook, but the plan eventually fell through.10 According to Linus Torvalds, DSLR is simply security theater.11 Indeed, in this case, DSLR could be defeated by simply checking each possible offset. This would barely introduce any substantial complexity to the proposed algorithm.
Address Space Layout Randomization, enabled by default on compatible binaries beginning from Windows Vista12, has zero effect on memory scanning.
The only way to prevent encrypted game assets from being decrypted is to create your own game archive format. Unfortunately, custom archive formats would not play nice with the already existing Panda3D engine. Large game companies have attempted to create custom, encrypted archive formats before, but even these formats are easily reverse engineered by the community. Take for example the latest and hottest game: Cyberpunk 2077, for which modding tools capable of archive editing already exist.
It’s best to just accept that your game assets will eventually be accessed by someone, even if you don’t exactly want them to. Accepting this fact opens the gateway to productive creative work by the community, which creates free advertising for your game. The creative community around a game is often more implicated in keeping the game alive and flourishing than the actual creators.
I hope you enjoyed reading this article. I am confident that anyone who has read this article will walk away a little bit smarter, mainly more educated about file formats, C++ classes, reverse engineering and memory scanning.
If you have any questions or suggestions about this article, please feel free to reach out to me on Discord: Disyer#2168. Feedback is greatly appreciated!
-
Mike Goslin, Earliest version of Panda3D’s multifile.cxx class, line. 2, 2000. ↩︎
-
Mike Goslin and Mark R. Mine, “The Panda3D graphics engine”, Computer, vol. 37, no. 10, pp. 112-114, 2004. ↩︎
-
Mark R. Mine, Joe Shochet and Roger Hughston, “Building a massively multiplayer game for the million: Disney’s Toontown Online”, pp. 15, 2003. ↩︎
-
David Rose, Panda3D’s encryptStreamBuf.cxx class, line. 121-123, 2021. ↩︎
-
Heba Soffar, “Cheat engine features, advantages and disadvantages”, 2019. ↩︎
-
Andy Rich, “Diagnosing Hidden ODR Violations in Visual C++”, Microsoft Devblogs, 2007. ↩︎
-
Chen, P., Xu, J., Lin, Z., Xu, D., Mao, B., Liu, P., “A Practical Approach for Adaptive Data Structure Layout Randomization”, ESORICS, 2015. ↩︎
-
Nur Hussein, “Randomizing structure layout”, LWN.net, 2017. ↩︎
-
Linus Torvalds, “x86/fpu: move FPU state into separate cache”, Linux Kernel Mailing List, 2017. ↩︎
-
Michael Howard, Matt Miller, John Lambert and Matt Thomlinson, “Windows ISV Software Security Defenses”, Microsoft Docs, 2010. ↩︎